Today's topic is Wood Floor Repair Home Depot. Obviously, you can find a great deal of Wood Floor Repair Kit Syringe-related content online. The proliferation of online platforms has streamlined our access to information.
There is a connection between the DriTac Wood Floor Repair Kit RS-1 and HOME DEPOT INC information. more searching has to be done for wood floor repair home depot, which will also be related to hardwood floor refinishing cost home depot.
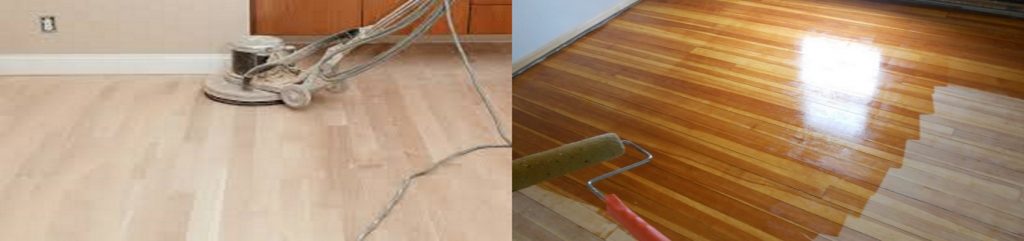
57 Things Wood Floor Repair Home Depot | Sanding your own wood floors
- “The warmth of solid hardwood floors is a nice reason to go for it,” interior designer Laura Umansky says, even though it is generally pricier. “They’re also a good option because they can be re-sanded and maintained pretty easily.” Plus, due to its long lifetime, hardwood flooring can often positively affect the value of a house if a homeowner is looking to sell. Source:
Internet - Resurfacing your hardwood floors will benefit you in the long run, especially if you decide to sell your home. People shopping the housing market are much more attracted to new-looking floors, so by resurfacing the floors in your home, you're sure to stand out amongst potential buyers, Speedy Floor Removal states. Additionally, resurfaced flooring adds value to your home, so by simply taking the time to upgrade your floors, you can list your home for an asking price that makes you feel confident and comfortable. Source:
Internet - Sandless floor refinishing costs $1.50 to $4.00 per square foot. Sandless refinishing uses chemicals to etch the old finish off, followed by a tinted finish that hides scuff marks and restores the wood's color and sheen. Sandless methods are not effective for floors with scratches, stains, or damage. Source:
Internet - Not at all. I’ve even dropped some super heavy stuff on the floor and there’s been zero damage. I’m honestly amazed at the durability of this floor! Source:
Internet - The grand finale of installing hardwood will often include trimming (likely using a jigsaw) the last row of boards to fit, and then face-nailing them. If your flooring is skirting any sort of obstacle—like a fireplace or kitchen island—the wood will also have to be custom cut in a similar fashion. And, if you are DIYing, always protect your physical health during the process by clearing out sawdust and wearing kneepads during an installation. Source:
Internet - Visible nails in new hardwood floors are less prominent than they used to be. The rise of tongue-in-groove construction hides nails through a method called “blind-nailing,” where the groove of each subsequent plank hides them in the tongue of the plank before it, and so on. “Face-nailing”—hammering a nail into a pilot hole—is used closer to walls, where a nailer often doesn’t fit. Source:
Internet - One of the most commonly asked questions I get on Instagram is about our wood floors from Home Depot. Where did we get it? How is it holding up? Do I like it? I tried to answer these questions as often as I can in stories, but I thought it might be helpful to put all that info in one spot so anyone can reference this in the future. So here’s a full review of our wood floors from Home Depot! Source:
Internet - When we removed the old floors, we had to decide if we wanted to remove the baseboards. That is typically what’s done when installing a new floor, but that was going to cost us a lot of extra money and time. So we installed this floor with the baseboards in place. The floor went up against the baseboard, then we used quarter round to finish it off and cover up any gaps. Such a great trick to save money and time on installing new baseboards! Source:
Internet - Refinishing oak, cherry, or pine floors costs $1.50 to $5.00 per square foot without staining or $2 to $7 per square foot with staining. Oak is the most common hardwood for flooring. Pine is softer than oak and requires extra care when sanding to prevent grooves or chatter marks in the wood. Source:
Internet - Compared to allllll the samples I got from from flooring stores, these floors were the most affordable option we found. I was honestly surprised at the price, because many similar we found were double (or more!) of the cost of these floors. Home Depot had the best price! Source:
Internet - Papers will go in sequence starting at 36 or 40, then to 60 grit, 80 grit, 100 grit, and 120 grit. You can go up to 180 or 220, but before you do that, I'd think about hand sanding 2 sample pieces and putting some oil on. If you can really tell the difference between a 120 and 180 then go for it. I'd do it for a paying client simply because there will be an initial nose to the floor inspection, but for my own floors I stop at 120. Source:
Internet - Flooring trends may come and go, but hardwood is the classic, last-for-generations material desired by the largest segment of US homebuyers . What many first-time installers don’t realize, though, is that there is a flow-chart of choices to make when selecting an ideal hardwood. Your decisions can shape not only the installation process, but how to care for your floor for years to come. Source:
Internet - You cannot properly refinish hardwood floors without sanding. Sanding removes the old finish, scratches, dings, and discoloration. For floors with a dull sheen and only minor scuffing, consider screening and recoating instead. Source:
Internet - A sealer coat is not normally needed, but if your floor takes stain unevenly, it will help ensure even stain coverage. Test for this by applying stain to an area that will not be visible once the furniture is moved back into place. It is essential to apply the sealer evenly. Otherwise, ”holidays” (skipped areas), stop marks, and lap marks may show through after staining hardwood floors. Source:
Internet - With prefinished boards, you’ll be able to choose the exact shade, grain, and finish of your hardwood floors from the get-go. This allows for a more concrete vision of what the flooring will look like when fully laid out (with no unwanted surprises). Unfinished boards—which are installed first and stained later—make for a more customized look, but are something of a gamble if the stain doesn’t turn out quite the way you envisioned it. Source:
Internet - “I think hardwood is timeless,” says general contractor Jessica Pleasants. “And the finishing product you use—whether it’s a penetrating oil, polyurethane sealant on top, or a prefinished material—will greatly affect the overall final look of your floors.” Source:
Internet - It's important to start the machine with the paper OFF the floor. Once you tilt it down and the sandpaper touches the wood, it will instantly start pulling you.This forces the operator to switch actions from pushing to pulling - usually eyes popping as you strain every muscle in your arms tring to stop it hurtling across the floor and through the wall opposite. These things are brutal, and pull your arms out of their sockets. Source:
Internet - Drum sanders - oh boy, this is where things get a little different, and the stakes go right up. If sanding a floor for the first time was like learning to drive, choosing a drum sander would be like choosing a stick shift instead of an automatic. With lots of hill starts. Blindfolded and with Metallica blasting on volume 12. Source:
Internet - And as I said, be sure to wear proper protection from breathing dust particles, especially if you are repairing old floors with a finish on them. Small paper masks protect you a little, but not much. Despite being a sweaty pain to wear in hot weather, wearing a respirator is a really smart idea to protect your lungs. Source:
Internet - This easy-to-use, consumer-friendly hardwood floor repair kit corrects the hollow spots and popping conditions that sometimes arise in engineered flooring installations. Unlike other hardwood repairs that may require board removal, the DriTac Kit is a simple application that only requires the use of a drill and hammer. No noxious fumes or raising of dust occurs during the repair process. Repairs can be accomplished in a matter of minutes. Source:
Internet - floors with scratches, dings, discoloration, or slightly uneven areas. Replace floors with water damage, noticeably warped planks, subflooring issues, or wood that is too thin to sand. Flooring installation costs $6 to $18 per square foot , depending on the material. Source:
Internet - Hardwood floor refinishing can be challenging, but it most definitely can be taught. We learned the nuances of our craft over years and we can safely say that experience is something that you can't teach. Hardwood floor refinishing is very much an art. We'd like to let you behind the curtain as we begin a multi-part series that details the ins and outs of hardwood floor refinishing. Look for the other parts of this series to come out in the coming weeks. Source:
Internet - After removing the carpet and laminate flooring, we hired a contractor to install the wood floors from Home Depot. We ordered all of it online and the it took about 2 weeks for delivery. But since this flooring comes pre-finished, there was no staining or sanding. So the install process only took about 3 days total and then we were able to move in right away. Source:
Internet - before walking on the floor in socks. Don't walk on the floor with bare feet or shoes for at least . Wait 4 to 5 days before moving furniture into the room. Source:
Internet - https://www.homedepot.com/p/Home-Legend-Wire-Brushed-Barstow-Oak-1-2-in-T-x-2-3-4-in-W-x-Varying-Length-Engineered-Hardwood-Flooring-21-70-sq-ft-Case-HL314P/206279420 Source:
Internet - If you decide you are brave enough anyhow, (really?) you will need to buy several different grits of paper and some cushioning pads. These are available at the rental counter, someone there can likely help you determine how many of each you will need based on the square footage of your job, but buy a few extra as they can usually go back. This is a common practice, and you will be going back to return the machine anyway so there is no inconvenience or wasted trip - better to have too many pads than not enough - and catching just one proud nail in an old floorboard you didn't notice before very quickly rips up a pad - which goes straight into the bin. Source:
Internet - Replacing your hardwood floors is an expensive venture. According to U.S. News, depending on the size of the room, the materials you need, and the labor costs, homeowners typically pay anywhere between $2,800 to $6,400 to replace hardwood floors. Instead of fleshing out thousands of dollars to upgrade your hardwood floors, resurface them yourself! By resurfacing your hardwood floors on your own, you can expect to pay somewhere between the $500 and $1,500 range, saving yourself a ton of money. Source:
Internet - Renting a floor sander costs $60 to $70 per day or $230 to $270 per week. Renting an edger to handle the room's corners and edges costs $37 to $46 per day or $170 to $185 per week. DIY refinishing projects typically take several days, depending on the home's size. Source:
Internet - Well I hope this is helpful if you’re shopping for new wood flooring. If you still have any questions, feel free to ask away. I’m happy to help! xo Source:
Internet - Really the only step you can feasibly skip is the initial paper you choose. If the newly installed floor is quite uniform, you may be able to start right at 60. How long you spend on a floor is really determined by how well it is installed and how long it takes on your first pass to get it to a point where you are happy. Source:
Internet - The cost to screen, buff, and recoat hardwood floors is $1.00 to $2.50 per square foot. Screening uses a thin buffing disc to remove the old finish without sanding the wood beneath. Recoating removes minor scuffs and scratches on the surface and adds a new sheen to dull floors. Source:
Internet - While you're at it, you might as well get a couple of those disposable all-in-one's like on CSI, complete with the pull on booties for after the floor is all prepped to make sure you don't drag something all over it out of the garden. Once you've got all that on, you'll be too hot, and/or nature will call - so you'll probably end up doing the job without protection and suffer for weeks after with sinusitis. It's not big, and it's not clever to ignore safety warnings folks - and now you can't say I didn't warn you... so on your head's be it! Source:
Internet - For all types of sanders (especially drum sanders), if you're hoping for any kind of a decent finish to your wood floor it's important to keep the machine moving. If you stick around in one spot you will start to dig yourself a bit of a hole (literally) that will be hard to fix with the next grit. Very, very hard if it's a laminate and you grind right through it! Source:
Internet - Random orbital sanders are the best choice for do-it-yourself hardwood floor refinishing. They take longer to remove old finishes than drum sanders, but they do not require a lot of experience to use and are less likely to damage your wood floor. With a random orbital sander, you can move with or against the wood grain. Source:
Internet - Refinishing engineered hardwood floors costs $2 to $6 per square foot on average. Engineered flooring features a base layer with a solid hardwood wear layer on top. Engineered floors may be sanded and refinished 1 to 5 times, depending on the wear layer's thickness. Source:
Internet - Many pros pour polyurethane along the floor and then spread it with an 18-inch lamb’s wool applicator, but this is likely to result in a layer that’s too thick for the novice. A better way for the do-it-yourselfer is to roll on the polyurethane using a foam roller, preferably a high-density foam roller. The coat will be thin, even, and will quickly dry to a glassy smooth finish. Use a good brush for cutting in around the room perimeter. Source:
Internet - Refinishing your floors? Some jobs are better left to the pros. Get free, no-commitment estimates from licensed flooring contractors near you. Find local pros + Source:
Internet - Refinishing a hardwood floor requires a minimum of three passes with the sander using sandpaper in three different grits. Otherwise, skipping a step causes rough-looking floors and uneven staining. Start with the coarsest grit and progress to the finest grit: Source:
Internet - Even if you aren't looking to sell your home, it's worth resurfacing your floors. You'll no longer have to wake up to a home with floors that are dull and full of cracks. Instead, you'll have a gorgeous hardwood floor you can be proud of. Home Depot offers a guide for DIY floor resurfacing, and here's what you need to do it. Source:
Internet - DIY hardwood floor refinishing costs $600 to $1,100 for equipment rental and supplies. Refinishing floors yourself without experience can easily ruin hardwood floors. Sanding incorrectly may cause uneven floors or deep gouges in the wood, requiring the replacement of individual planks or the entire floor. Source:
Internet - What's under your feet (or however you get around) is as important as anything when it comes to home. That's why this fall, we collaborated with The Home Depot on an A to Z guide that'll give you the confidence to make flooring choices you'll love. Check out the A to Z handbook here. Source:
Internet - Tipping floor refinishers is optional but they always appreciate the gesture. Standard tipping rates for floor refinishers are $10 to $30 per person if their work quality exceeds your expectations. Workers also appreciate being offered access to a bathroom in the home throughout the day. Source:
Internet - Proceed with abrasives that are gradually finer until you reach the desired degree of smoothness. (My preferred progression for a hardwood floor such as oak begins with 60-grit abrasive, goes to 80-grit, and finishes with 100- or 120-grit.) Source:
Internet - DriTac has developed a system to repair the hollow spots and popping conditions that occur within engineered hardwood flooring installations. These defects cost the flooring industry millions of dollars per year. Studies and experience show that a major cause of these problems occurring in engineered hardwood floor installations are adhesive voids between the flooring and the sub floor. Introducing DriTac Engineered Wood Floor Repair Kit Source:
Internet - Additional costs to redo hardwood floors Factor Additional cost Dustless refinishing $2 – $4 per square foot Additional coats of finish $0.50 – $1.75 per square foot Moving furniture $20 – $50 per room Removing wax build-up $100 – $200 per room Carpet removal & disposal $0.25 – $1.00 per square foot Refinishing stairs $25 – $85 per step Wire-brush finish $2 – $5 per square foot Source:
Internet - The DriTac Engineered Wood Floor Repair Kit is designed to correct and eliminate hollow spots and popping conditions for engineered wood floor installations. Major causes of these problems for engineered wood floor installations are adhesive voids between the flooring and subfloor, costing the flooring industry millions of dollars per year. DriTac’s engineered wood floor repair kit is an Source:
Internet - floors with water damage, noticeably warped planks, subflooring issues, or wood that is too thin to sand. Flooring installation costs , depending on the material. Refinishing may not completely eliminate pet urine stains or odors. Consider replacing the damaged planks or the entire floor; or refinishing and covering the floor with a dark wood stain. Source:
Internet - Before attempting the refinishing of a wood floor, know what you're tackling first. Is your floor old floorboards that have been covered with carpet? Are they good enough for sanding and finishing? Are you sure? Did you pull all the gripper rods off first that held the carpet in place - because sometimes they use no-nails AND nails, and that makes a mess as the planks often split when you try to get them off. There's little worse than slaving over the perfect finish to your wood floor only to be hobbling around very shortly after when you scuff the floor with your bare foot one evening after a couple of pints and drive a splinter under a toenail. Source:
Internet - Sanding and refinishing hardwood floors costs $1.50 to $5.00 per square foot for labor and materials. Sanding removes the old finish and the surface layer of the wood to eliminate scratches, dings, and discoloration. After sanding, contractors apply multiple coats of clear finish seal and protect the floor. Source:
Internet - Is the floor a solid or engineered hardwood? Some engineered floors can be sanded and refinished but not all - generally speaking it needs a few thou of laminate before you should consider sanding and refinishing, maybe try a hidden area first, like inside the bottom of a closet. If the floor is a solid hardwood planks, congratulations, you should be good to go. But, one word of caution because I've seen someone try it, make sure your floor isn't a very realistic laminate before renting a sander for the weekend... that absolutely doesn't work. Source:
Internet - Move the floor sander as though you are mowing the lawn. Proceed row by row, overlapping runs by half the sander’s width. You will have to make numerous passes with each grit. Source:
Internet - “With prefinished—or even unfinished—solid hardwood, there is a certain physicality to it that the [engineered] flooring doesn’t have. And once you get everything in place during installation, you're off to the races.” Source:
Internet - Square vibrating sanders are the easiest to use and the hardest to screw up with. You can rent one at most major home building stores, and like with buffers, you'll need to purchase pads and paper. This is really you're best option if you haven't sanded floors before, but here's hoping it's just a powder room floor - seriously, it needs to be small for this option to work. Source:
Internet - Carpet removal and disposal costs $0.25 to $1.00 per square foot alone, plus $2 to $7 per square foot for hardwood floor refinishing. Removing carpet from stairs adds $7 to $10 per step. Source:
Internet - Buffer sanders work in a circular motion, it's the same machine that is often used to polish and clean industrial and commercial floors. If you've used one in any other application you could give it a try, but sanding floors might not be the best place to learn. They have a very sensitive balance and will take off across the floor spinning wildly and wrapping the cable around your legs as they go if you don't yet have the magic touch. And if you even have to ask "do I?" - you don't. Source:
Internet - Solid hardwood floors may be refinished 4 to 10 times, depending on thickness and age. Homes built before the 1920s often have thinner wood flooring. Screening and recoating is a better option for floors that are too thin to sand. Source:
Internet - Be ready with a broom and dust pan, and ideally a shop vac. Be sure to use vacuum attachements with soft bristles, hard plasic can leave lines across the floor. Also, if you vacuum with the grain, there is less chance of leaving any visible marks. Get as much of the dust off as possible, if your floor is nailed planks make sure any nail heads are under the surface (as otherwise they tend to rust over time and leave stains. Source:
Internet
Following are some suggestions on where to begin your search for data on DriTac Engineered Wood Floor Repair Kit: You should try to find HOME DEPOT INC-related information from reputable places. Libraries, online resources, and even paid journalists all fall under this category.
It's crucial to be aware of the many electronic media sources available when researching Best Laminate Floor Repair Kit, such as Google and YouTube. You may also get info about Wood Floor Scratch Repair Kit Home Depot on social media sites like Facebook and Twitter.
# Video | Wood Floor Repair Home Depot
It's crucial to read to examine the authenticity of each source in order to acquire the greatest information regarding Floor Wood And Laminate Renewal Kit. You'll learn more about hardwood floor refinishing kit home depot after watching the films included in this post, which come from a variety of different sources. Information on a wide range of topics may be easily accessed via the internet.
Notable features of What You Need To Buy From Home Depot To Resurface Your Hardwood Floors include:
- wood floor repair home depot
- dritac wood floor repair kit home depot
- hardwood floor repair home depot
- wood floor refinishing home depot
- wood floor scratch repair home depot
Because there are so many websites and forums that provide information about Wood Floor Scratch Repair Kit Home Depot, it should not be difficult for you to locate the data that you want. The majority of individuals are accustomed to taking a completely different approach when it comes to obtaining information regarding Wood Floor Injection Kit. This makes it possible to take a more in-depth look at the information that is available about Wood Floor Repair Kit Syringe and how it might be utilized.
# Images | Wood Floor Repair Home Depot - wood floor refinishing home depot
wood floor repair home depot - Chemical Abrasion Kit For Wood Floors
 Save
Save
Laminate Floor Repair Kit - Wood Floors from Home Depot- My Full Review
 Save
Save
methods for producing information displays about Rust-Oleum Wood Floor Transformations Kit that are both aesthetically pleasing and functional. In commercial and marketing settings, as well as for the purpose of conveying information on Wood Floor Refinishing Kit, they are useful tools to have. Because of this, we also supply some photographs relating to Hardwood.
In summing up, I'd like to say that this article offers a general summary of Laminate Floor Repair Kit. Also covered are Wood Floor Scratch Repair Kit Home Depot and Wood Floor Scratch Repair Kit Home Depot, which serve as a benchmark for evaluating the depth of your understanding of Hardwood Floor Repair Kit.
Reference:
https://jujushonia.blogspot.com/2022/11/69-most-water-coming-up-from-cracks-in.html

0 comments